
Overview
Landing Pages
Your registration website. Design branded pages that reflect your organization, not your event software. Start from a template or customize every detail.
Your guest goes to register and lands on a page that looks nothing like your team
It reads like a startup threw together a quick page, not an established team running polished events. Guests pick up on that.
Full Design Control
Choose your own fonts, colors, and imagery. Start from a template or customize every detail until the page looks like it came from your team, not your software vendor.
Build Once, Reuse Everywhere
Save templates to your global library. Your next executive dinner starts from your last one.
What Landing Pages Are
Section titled “What Landing Pages Are”Landing pages are your registration website. When a guest clicks their RSVP link, this is the page they see. You control the design, the content, and the branding. The page reflects your organization, not your software vendor.
One Page Live at a Time
You can have multiple templates for your event, but only one is “in use” at any moment. That’s the one guests see.
There’s no publish button. Changes save automatically, and you can swap which template is live anytime.
Every guest sees the same page regardless of how they got there. Personal links, public links, and referral links all point to the same landing page.
Local vs Global Templates
Local templates live within one event only. Design something for your March dinner, and it stays with that event.
Global templates live in your library, available across all events. Design once for executive dinners. Duplicate it to global, and your next executive dinner starts from a proven foundation.
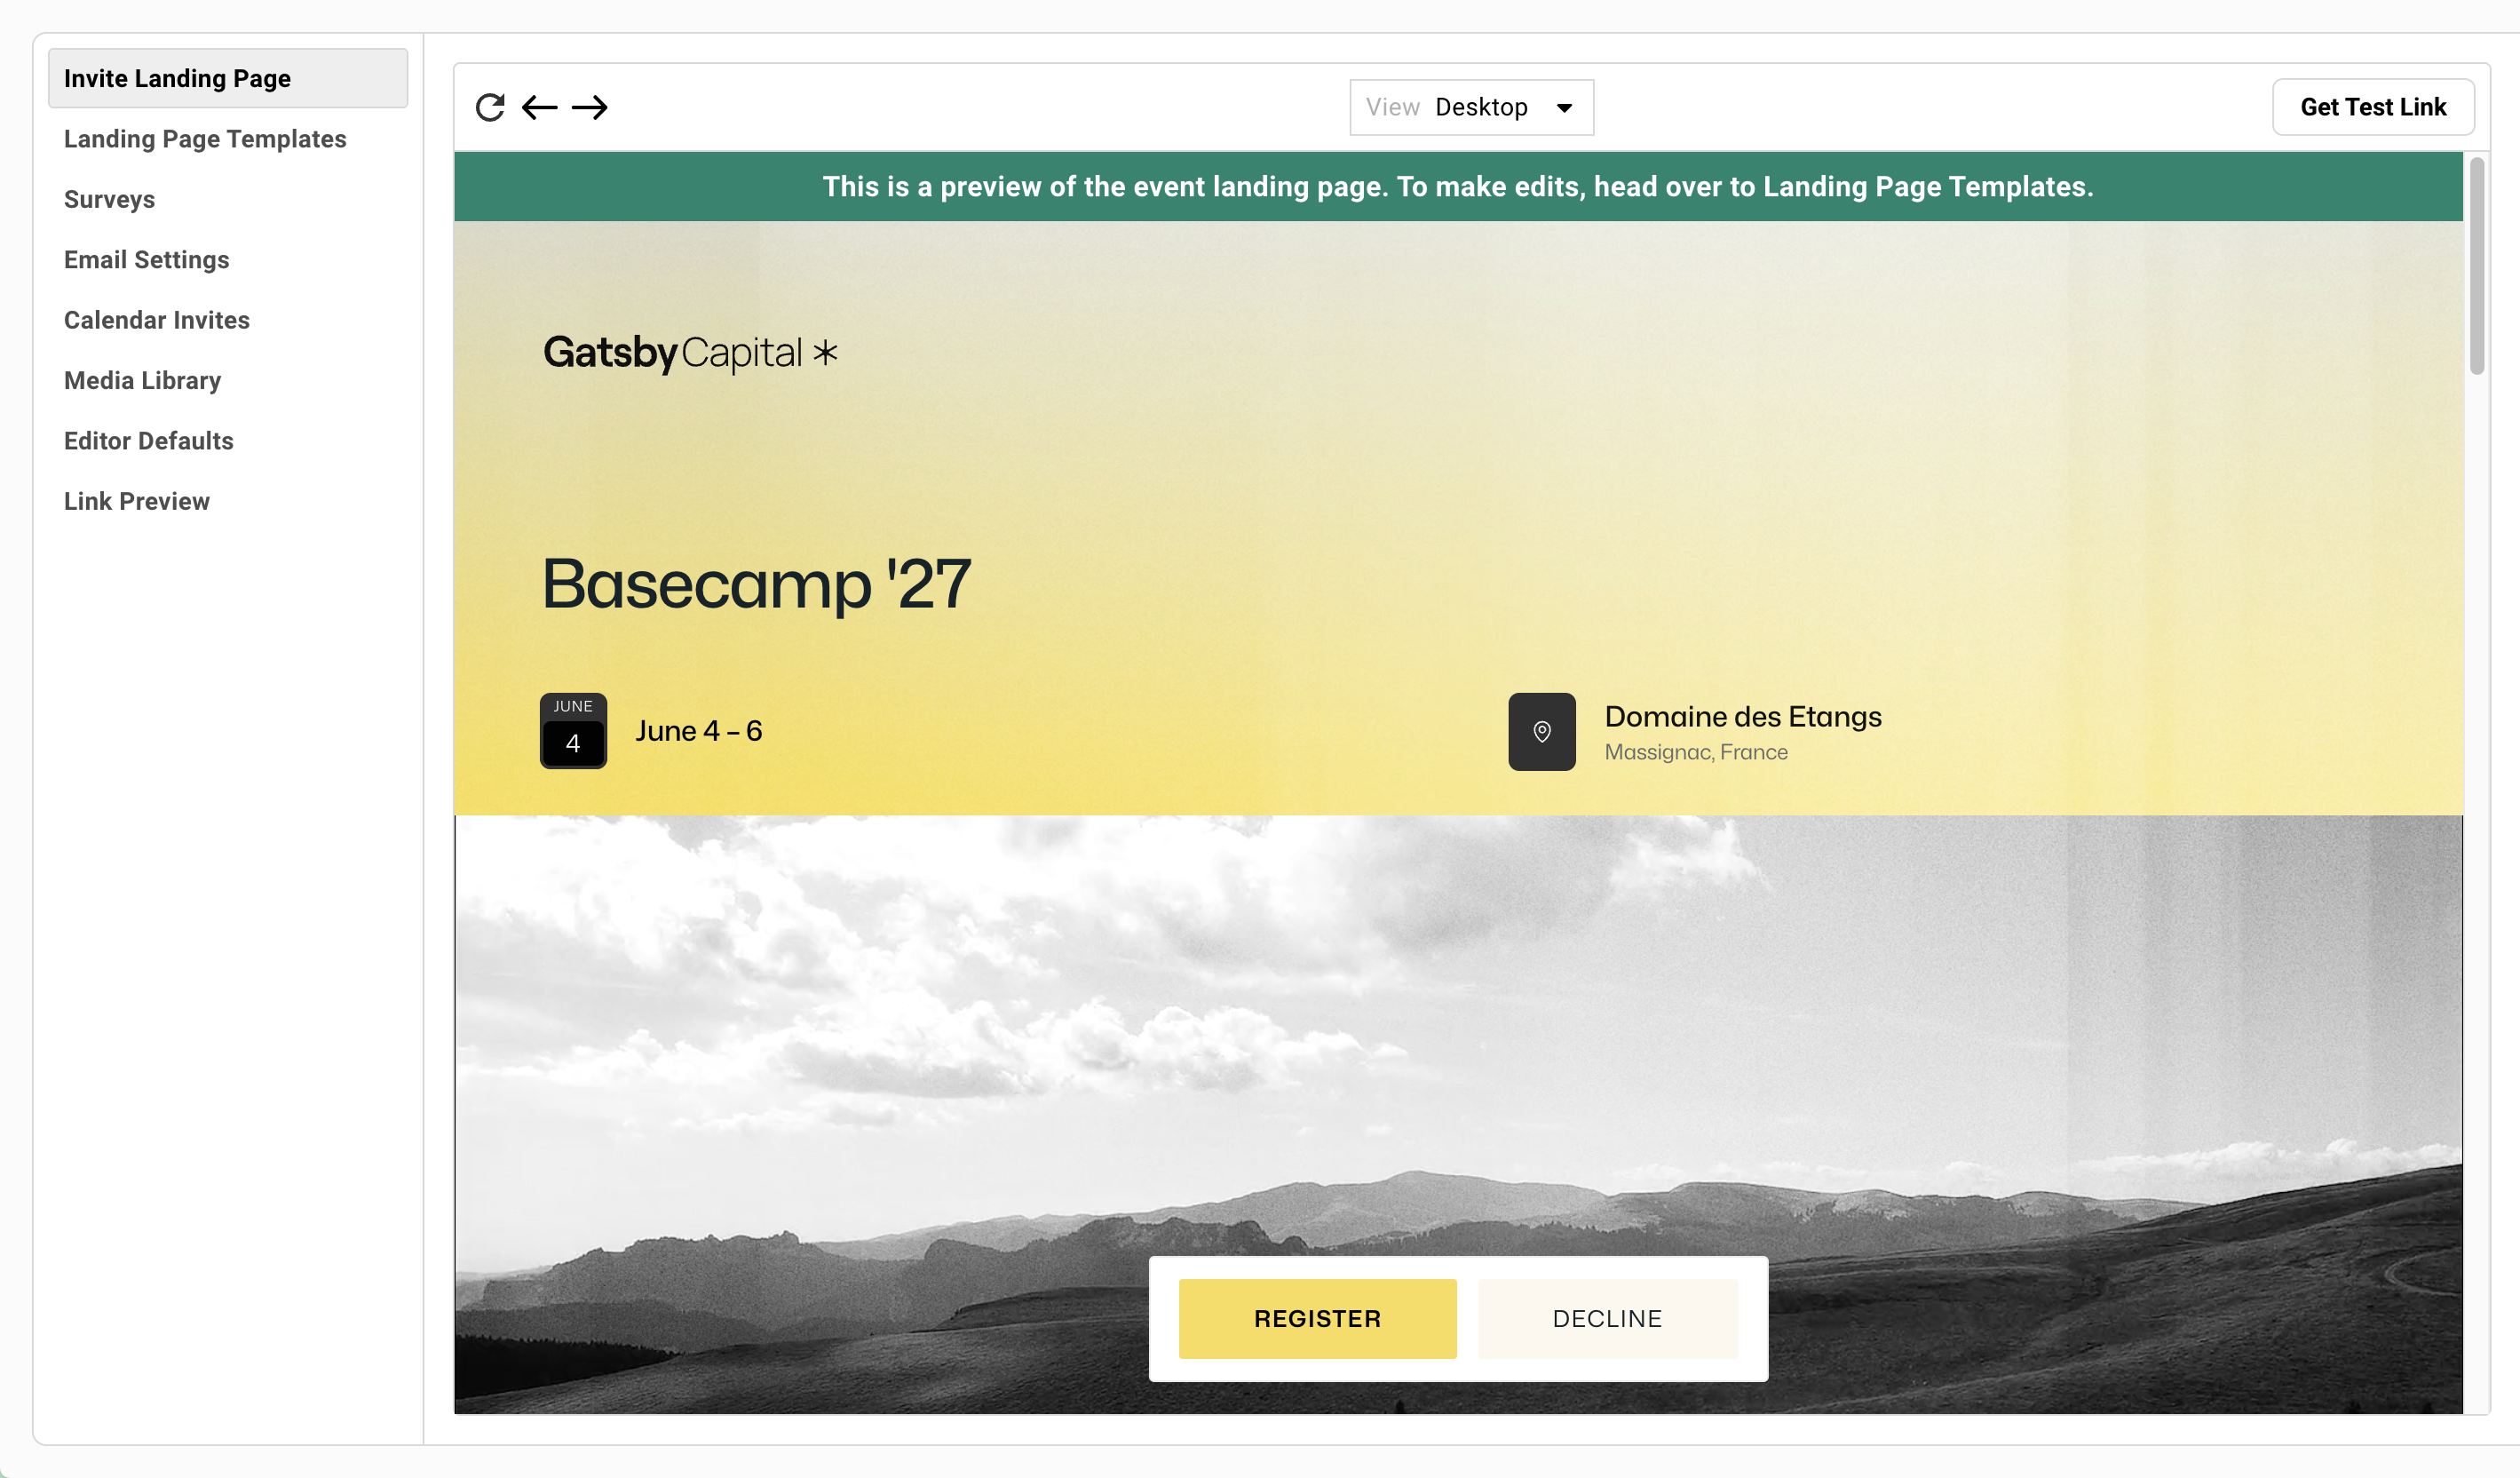
Browsing and Starting
Section titled “Browsing and Starting”Browse the template library and preview your options before committing. Once you find one you like, duplicate it to your event and customize from there.
Finding Templates
-
From your event’s Registration tab, click Landing Page Templates.
-
Browse available designs. Gatsby templates and your team’s saved templates appear here.
-
Click any template to preview it on desktop, tablet, and mobile.
Preview Modes
Preview shows what guests will see in different registration states.
Normal registration shows Accept, Decline, and Maybe buttons as configured.
Waitlist mode shows a single button that joins the waitlist.
Registration closed shows the page with no active buttons.
See how buttons change in each state before going live.
Duplicating to Your Event
You cannot edit global templates directly. They belong to everyone.
-
Preview the template you want.
-
Click Duplicate to Event.
-
The template becomes a local copy you can customize.
-
After customizing, you can duplicate back to global to save improvements for future events.
Using the Global Library
Section titled “Using the Global Library”The global library stores templates that any event in your organization can access.
What Global Templates Contain
Fonts, colors, logo placement, approved content structure.
Someone on your team designs the executive dinner template once. Everyone who runs executive dinners starts from that foundation. No more hunting for the “right” version.
Promoting Local to Global
-
Customize a template for your event.
-
Open the template’s dropdown menu.
-
Select Duplicate to Global Library.
-
The template is now available for any future event.
Recommended Workflow
-
Browse the global library first.
-
Duplicate a template to your event.
-
Customize for this specific event.
-
Set as in-use.
Start from what exists. Customize what you need.
Basic Mode
Section titled “Basic Mode”Basic is where the editor starts. It locks the layout, so you change content without breaking how the page looks on a phone.
What You Can Do
-
Replace images and logos.
Click any image to upload a new one.
-
Edit text content.
Click any text block to update it.
-
Update colors and fonts.
Use “Change all fonts and colors” for quick brand application.
-
Move blocks up and down.
Reorder content without breaking the layout.
-
Duplicate or delete blocks.
Expand agendas or speaker lists. Remove sections you do not need.
What You Cannot Do
- Change text size
- Add new block types
- Change padding, spacing, or responsive breakpoints
- Deep layout modifications
That requires Advanced mode.
Why the Limits Exist
The limits protect your brand. Your event team cannot accidentally break the mobile layout, and non-designers stay within safe boundaries. The approved design stays approved.
Advanced Mode
Section titled “Advanced Mode”Sometimes the template is close but not quite right. You need different padding on mobile, custom spacing between sections, or a block type that the template didn’t include.
Basic mode can’t do that. Advanced can.
Switching Modes
The Mode switch sits at the left of the editor toolbar. Click Basic or Advanced to change modes. Your content stays exactly as it is.
Advanced adds three controls to the toolbar: Add Block, a page size menu with device presets and a custom width and height, and a Colors and styling menu. Both modes keep the device previews and zoom.
The editor opens in whichever mode you used last. Your choice doesn’t change the mode for anyone else on your team.
In Basic, settings that only work in Advanced still show in the right panel. Crop Style and Image Style on image blocks read “Available in Advanced mode” with a Switch to Advanced link that changes modes and keeps the block selected.
What It Unlocks
-
Copy and paste blocks between templates.
Grab a section from one design, use it in another.
-
Add new block types.
Insert blocks that did not exist in the template.
-
Modify responsive breakpoints.
Control exactly how content adapts to different screen sizes.
-
Precise spacing and sizing.
Every padding value, every width, every margin.
When to Use It
- When Basic mode cannot do what you need
- When building a new template from scratch
- When copying elements between templates
- When you need pixel-level control
Learning Resources
Advanced mode is more complex than Basic and takes time to learn.
Detailed tutorials are available in the video help center when logged into Gatsby. Start there.
Content Blocks
Section titled “Content Blocks”Everything on your landing page is a block. Different block types serve different purposes.
Block Types Reference
Text blocks
- Text: Written content and descriptions.
- Bullet list: Unordered lists for agendas and highlights.
- Number list: Ordered lists for schedules and sequences.
Media blocks
- Image: Full images with optional captions.
- Cropped Image: Images with custom crop settings.
- Video: YouTube links, Vimeo embeds, or direct uploads (24MB max).
- Embed: External content like maps or forms.
Structure blocks
- Layout: Organize content into columns.
- Horizontal Set: Side-by-side elements in a row with wrapping.
- Divider: Visual breaks between sections.
Action blocks
- Button: External links to other pages.
- Invite Buttons: RSVP actions. This block is always connected to Gatsby’s registration modes. Which buttons guests see is set in Registration. How they look is set here, from the RSVP buttons card in the left column. To link somewhere else, use a regular Button block instead.
Block Settings
All blocks share common settings:
- Background color
- Width and height
- Corner radius
- Borders
- Padding
Specific blocks have additional settings unique to their type. Click any block to see what you can configure.
Sizing Images, Logos, and Columns
These settings require Advanced Editor mode.
Images. Set images to Fill width, not Fixed. A fixed-size image doesn’t adapt to the screen and can clip on phones.
Logos side by side. Avoid fixed sizing here too. Keep each logo proportional and set it to fill the width of its column. To balance logos that look uneven, adjust the column proportions in the Layout (give the wider logo a slightly wider column) and add padding around the smaller one.
A thin gap of background above a block. New blocks come with top padding by default. If you see a sliver of background above an image or section, select the block and remove its top padding.
Columns of uneven height. Select the Layout and turn on Match Column Heights. If one column still falls short, check whether its blocks have been grouped together. Copying and pasting a column can group its blocks, and the group then needs to fill the column’s height too.
How to Add a Google Maps Embed
Requires Advanced mode.
-
Click Advanced in the Mode switch at the top of the editor.
-
Click Add Block and select the Embed block type.
-
In the embed block options, select Google Maps.
-
Type your location name. Google will search and pull up the address.
-
Set the block to Full Width and choose a height that works for your template (around 400px is a good starting point).
Fixed-size blocks are not responsive. Use Full/Fill Width so blocks adapt to different screen sizes.
The Sticker Sheet
Section titled “The Sticker Sheet”The Sticker Sheet is a library of pre-designed blocks that came with your template. If you deleted a section and need it back later, this is where you find it.
What It Is
Pre-designed blocks that came with the template.
Toggle between Page view and the Stickers view in the editor toolbar. Page shows your landing page. Sticker Sheet shows blocks you can add.
When to Use It
You deleted the agenda early on. The event was six weeks out. No agenda finalized.
Now it is two weeks out. Agenda is ready. You need the section back.
-
Switch to Sticker Sheet view.
-
Find the agenda block.
-
Click Add to page.
-
Edit the content.
Why It Matters
You can safely delete sections you do not need yet. Add them back later without redesigning from scratch.
The template’s original components stay in its Sticker Sheet.
RSVP Button Options
Section titled “RSVP Button Options”You deleted the “Maybe” button in the template editor, but guests still see three buttons. That’s because which buttons show is an event setting, and the template only decides how they look.
A template carries all five RSVP buttons: Yes, No, Maybe, Join Waitlist, and RSVP Closed. The event decides which of them a guest gets. The same template might show Maybe on one event and hide it on another.
Where to Configure Buttons
Go to Registration » Invite Landing Page. The settings to the right of the preview are split into four groups.
- Are RSVPs open? Set RSVPs to Open, Closed, or Waitlist. While they are Open, Close them automatically closes them when capacity is reached or a date and time passes.
- How guests get in. Personal links, the public link and its settings, referral links, and Skip the page, go straight to the survey.
- What guests can choose. Accept is always on and locked, so every guest can say yes. Turn Maybe on or off, separately for personal links and the public link. If your org can turn off declining, Decline appears here too. Otherwise guests can always decline.
- Everything else. Plus ones, the confirmation page, guest permissions, and sub events. None of it changes which buttons a guest sees, so it stays folded shut until you click it.
Each group shows a setting only when it can have an effect. The public link column appears once the public link is on, and the automatic-close rules appear only while RSVPs are Open.
These settings control what guests actually see. Not the template editor.
Styling Buttons in the Template Editor
The RSVP buttons card sits in the left column of the template editor, under Event Details. It lists every RSVP button, drawn the way a guest gets it, so you never have to hunt for the button block on the canvas.
Switch the card between Guest list and Public link to see each audience. The card splits the buttons into the ones those guests see and the ones they don’t see, with a reason under each hidden one.
-
Open the template from Landing Page Templates.
-
In the RSVP buttons card, click the button you want to style.
-
The canvas switches to a state that shows that button, and its styling opens on the right.
Hidden buttons stay in the card so you can style them before you need them. Cut off for guests under a button means its label is too long for the space guests will see.
Turning Maybe or Decline On from the Template Editor
When Maybe or Decline is hidden for an audience, the card shows a link such as Turn on Maybe to use it under that button.
Click it and choose which guests should get it: Guests on your list, Anyone with the public link, or both. This changes the event’s setting, the same one under What guests can choose in Registration.
To change the rest, click Set which ones appear in Registration at the bottom of the card. Registration opens in a new tab with What guests can choose highlighted.
Common Configurations
Accept + Decline (default)
Standard two-button setup. Clear yes or no.
Accept only
No decline option. Useful when you want to minimize friction.
Accept + Decline + Maybe
Let guests indicate interest without full commitment. Maybe is treated similar to Accepted. Follow-up recommended.
Waitlist mode
Single button joins the waitlist. Used when capacity is full or you want to control acceptance manually.
The Common Mistake
Deleting button labels in the template editor does not remove the button. The button is still there. Just with no label.
Configure visibility in Registration, not the editor.
See Capacity and Waitlists for when to use waitlist mode.
The Everything else group on the Invite Landing Page covers settings that go beyond buttons: response-edit restrictions, outcome-specific confirmation headers, and whether a rejected guest shows as Not Approved. See Capacity and Waitlists for the approval-related settings and Forms and Surveys for confirmation-page configuration.
Common RSVP Scenarios
Section titled “Common RSVP Scenarios”Approving public registrants, closing at capacity, offering a Virtual option, skipping the landing page, splitting an event into sessions. Common RSVP Scenarios walks through the setups teams ask about most, with the exact settings for each.
Previewing and Testing
Section titled “Previewing and Testing”Preview what guests will see before going live. Test every button state.
The Preview Screen
The Registration tab opens to the Invite Landing Page preview by default. This shows what guests see when they click their link.
Use the preview to check:
- How your page looks with current content
- Which buttons each kind of guest gets
- Overall layout and branding
Previewing as a Specific Guest
Your guest list and the public link can get different buttons, and a full or closed event changes them again. Previewing as above the preview lets you pick who is looking:
- Someone on my guest list
- Someone with the public link
- Someone arriving after the event fills up
- Someone arriving after RSVPs close
- Someone sent a save the date
The preview redraws as that person’s page, and the line under the picker names their buttons, for example They see Will Attend and Decline.
When nobody can reach that page yet
Some choices describe a page your event can’t produce. If nothing sends guests to a waitlist, nobody will ever arrive after the event fills up. The picker marks those options, and choosing one shows an amber note such as Nothing sends guests to a waitlist yet. and a button, such as Set one up, that takes you to the setting that would change it.
Jumping to a setting
Settings you reach from a note, or from Set which ones appear in Registration in the template editor, flash once when the page opens so you can find them.
Device Previews
View your page on desktop, tablet, and mobile.
The viewport is pixel-accurate. Cycle through viewport presets to ensure your page works on all devices. Check mobile especially. Most guests will view on their phones.
Survey and Confirmation Preview
Click through buttons to preview the full guest experience.
- Click Accept to see the survey form
- Complete the survey to see the confirmation screen
- Verify the entire flow before going live
Test Links vs Live Links
Preview uses a test link. Nothing auto-fills.
Live personal links will show pre-filled guest information (name, email, company). Public links will show empty form fields.
To walk the flow outside Gatsby, pick someone in Previewing as and click Get test link for this view. The copied link opens that person’s version of the page. Nothing you submit there is saved, and no confirmation email or calendar invite is sent. The button is unavailable for a page nobody can reach yet.
Media Library
Section titled “Media Library”A central library for images and videos used across your templates and events.
How It Works
Upload assets directly to the media library. Or add them while editing a landing page. Either way, they appear in your library.
Same asset can be used across multiple templates and events.
Replacing Assets
Update a speaker photo in the library. It updates everywhere that photo is used.
Useful when a speaker sends a better headshot. Or when you update your logo. One change, everywhere at once.
Managing Assets
Delete, rename, and organize images and videos. Same workflow for both.
Keep your library clean. Old assets pile up fast.
Sharing Your Event
Section titled “Sharing Your Event”When someone pastes your event’s link into Slack, LinkedIn, X, or a text message, the app shows a preview card with a title, description, and image. You set all three in Link Preview.
Where to Configure
In your event’s Registration tab, open Link Preview.
The preview on the right updates as you edit. Switch it between Default and X (Twitter) to see both layouts. It’s a close approximation. Each app draws its own card, and links people already shared may take a while to refresh.
Set this before sharing any links. First impressions happen before the click.
Title and Description
This is what people see before they click. The title uses your event name unless you enter one.
Keep the description to one or two short sentences. Apps may shorten it or leave it out.
Make it compelling. “Q3 Executive Dinner” tells them what. “Join 40 portfolio CEOs for an evening of…” tells them why.
Click Save changes to publish your title, description, and X card format. Discard returns everything to what you last saved.
Featured Image
The image that appears when your event’s link is shared. It also shows on your public events calendar.
Use 1200 × 630 pixels in PNG, JPG, or WEBP. Until you choose one, your links use the default Gatsby image.
The image saves the moment you pick it, separately from Save changes. A “Featured image updated” message confirms it. Use Replace or Remove to change it, and Undo if you remove it by mistake.
If you update the image but others still see the old one on Slack, that’s Slack’s cache. Add a parameter like ?1 to the end of the URL you share and Slack fetches the latest version.
X (Twitter) Card Format
Choose how your link looks on X:
-
Large image shows your featured image full width above the title. This is the default and the right choice for most events.
-
Compact shows a small square thumbnail beside the title. Use it when your image is a logo or doesn’t read well cropped wide.
This setting applies to X. Slack, LinkedIn, and messaging apps choose their own layout.
Public Links On vs. Off
Public link on. Anyone who pastes your public link sees your title, description, and image.
Public link off. The same link shows a generic Gatsby preview with no event details, and opening it shows a page saying the link isn’t active.
Personal links. These always show your full preview, whether your public link is on or off. If a guest pastes their invitation link into a group chat, everyone in it sees your event’s title, image, and description. See Registration Links for how the two link types differ.
View-Only Links
Section titled “View-Only Links”Share your landing page without enabling registration. RSVP buttons are visible but non-functional.
How to Get One
-
Open your landing page template.
-
Click the dropdown arrow next to the Edit button.
-
Select Get view-only link.
Use Cases
Design review
Share with your boss before going live. Get approval without enabling real RSVPs.
Parking and logistics
Link to a logistics page from your confirmation email. Guests can view details without re-registering.
Speaker bios
Create a standalone page with speaker information. Share or embed anywhere.
Live agenda at event
QR code at the venue linking to an agenda you can keep updated. Changes reflect immediately.
Common Questions
Section titled “Common Questions” Can I use my own fonts and colors?
Colors, always. Use “Change all fonts and colors” in Basic mode for quick brand application, or Advanced mode for precise control over every element. Font choice from Gatsby’s built-in library works the same way for everyone.
If the font list looks shorter than expected, scroll it with your mouse or trackpad. More fonts sit below the visible area.
Uploading your own custom font file must be done by Gatsby. Send us the font files, ideally in WOFF2 format, and we’ll add them to your account. For a licensed or purchased typeface, include proof of license. An invoice with “self-hosting” or “page views” as a line item usually covers it. If an agency bought the license on your behalf, the agency’s invoice works.
Once uploaded, your font appears under the Custom tab when you change fonts in the Landing Page Editor.
Can I add anchor links or more than one page?
No. A Gatsby landing page is a single page with no anchor links, so everything lives on that one page. If you need more room for content, add a section lower on the page.
If you need in-page navigation or multiple pages, see AI Landing Pages.
How much time does this take?
Anywhere from 20 minutes customizing an existing template to 20 hours building a fully custom design.
Most teams duplicate a template and update content in under an hour.
Why does my template show buttons I didn't want?
A template carries every RSVP button, and the event decides which ones guests get. The RSVP buttons card in the editor’s left column shows which ones this event’s guests see and why the others are hidden. To change them, go to Registration » Invite Landing Page and use What guests can choose.
Can I copy blocks between templates?
Yes. Requires Advanced mode.
If I delete a section, can I get it back?
Yes. Use the Sticker Sheet to restore pre-designed blocks that came with the template.
Do I need a landing page for every event?
For a standard event, the Invite Landing Page is what guests see when they click their link. Turn on Skip the page, go straight to the survey to bypass the need for having a landing page.
Landing pages are most valuable when you need to provide detailed information or build excitement. Executive dinners, conferences, and high-touch events benefit most from investing in the full editor; a Quick Event is the better fit when you don’t need that.
Image and file size limits/recommendations
Images on Landing Pages
- PNG, JPG, GIF, WEBP, AVIF, SVG supported
- Less than 5MB recommended (24MB maximum)
- Optimal size varies on template (use 2880px wide as a baseline)
- For a full-width header or hero, 2880px × 1380px works across the standard templates
- There is no mobile variant of an image. The same file scales down on phones, where most of your guests will open the page. Design the hero as a background texture and keep text, logos and any graphic element that has to stay readable out of it — put those in text blocks above or below the image, which reflow properly. Preview on a real phone before you send invitations.
Images in Emails
- PNG, JPG, GIF recommended
- Less than 2MB recommended (24MB maximum)
- In Marketing mode, 1200px wide recommended
Documents
- 24MB max per file
- PDF watermarking available
- All common formats supported
Videos on Landing Pages
- 24MB max for direct upload
- Unlimited via YouTube/Vimeo embed
- MP4 recommended format
- Gatsby does not re-encode/optimize videos for streaming